Playbook Creation
Enterprise edition
Playbook automation is available under the "OpenCTI Enterprise Edition" license. Read the dedicated page for full details.
OpenCTI playbooks are flexible automation scenarios that you can fully customize and activate to enrich, filter, and modify data created or updated in the platform.
You can access playbook automation in the user interface under Data > Processing > Automation.
Required capability
You need the "Manage Playbooks" capability to create playbooks. This is a separate capability because it grants users the ability to manipulate data beyond standard user access.
Creating playbooks
You can create as many playbooks as you need. Each playbook runs independently. Playbooks can be created manually from scratch, duplicated or imported from other OpenCTI environments. Playbooks can only be used when they are started running.
Each playbook needs to have three steps to be complete:
- Step 1: An Event source or Trigger
- Step 2: Components that filter, enrich or manipulate the data
- Step 3: An action to either notify a user or send for ingestion
- Step 4: Set the playbook to start
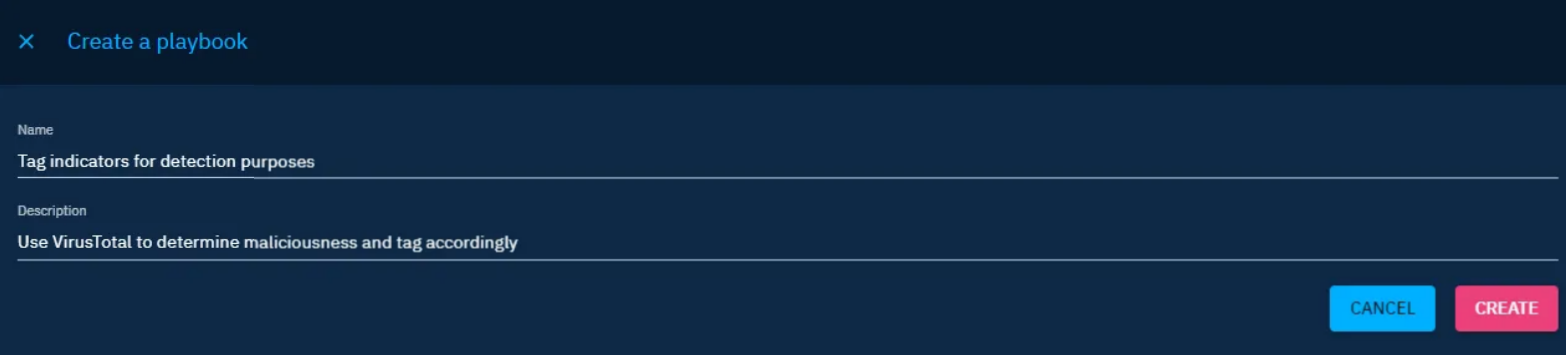
Create a playbook manually
Assign a name and description to each playbook.
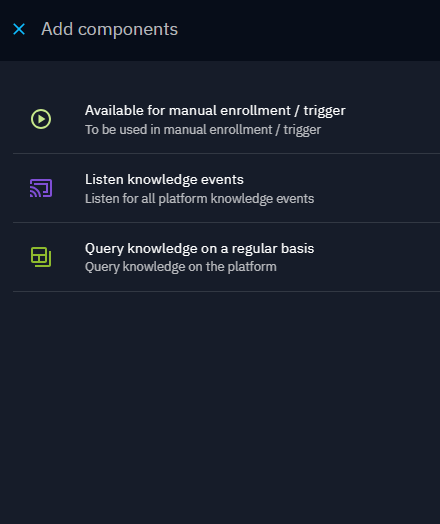
Step 1: Set your event source
The first step is to define your event source. Click the grey rectangle in the center of the workspace and select the input component that suits your needs.
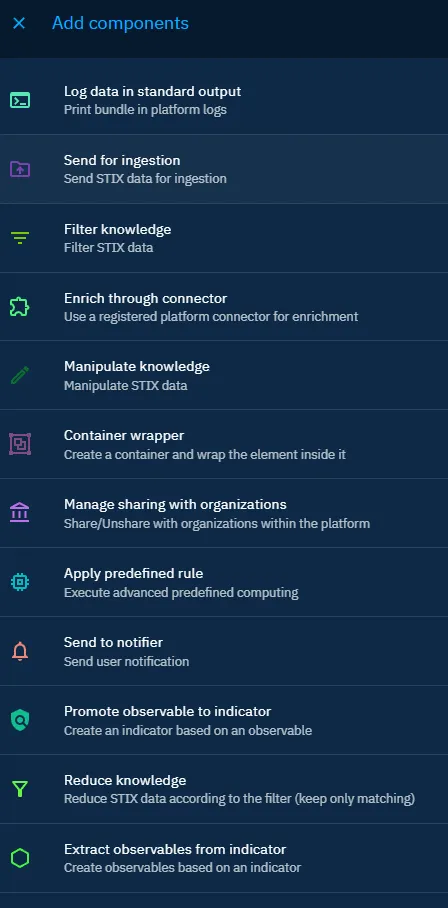
Step 2: Build your workflow with Playbook Components
You have flexible choices for the next steps in your workflow:
- Filter the data
- Enrich data using external sources and internal rules
- Modify entities and relationships
Use the various playbook components at your disposal to build these steps. See the Playbook Components page for full details of the available components.
To replace a component, click the ☰ (menu) button on the component.
To create a new branch at the same level, click the arrow icon in the bottom-right corner of a component.
To insert a component between two existing components, click the + button on the link between them.
Step 3: End your playbook
Finish your playbook by processing the bundle with at least one of the following components:
- Send for ingestion is required to update your OpenCTI knowledge with the modifications the playbook has made to the data.
- Send to notifier / Send email from template triggers a notification to users and can run in parallel with other actions in your playbook.
- Send to AI sends the STIX bundle to an XTM One AI agent as the final step of the playbook. This requires access to XTM One.
These components will complete a branch of your playbook. See the Playbook components page for full details of the available components. If you want to both send for ingestion and send a notification then you can use the option to “add a new branch at the same level from the parent output”.

Step 4: Start your playbook
To start your playbook, click the ☰ (menu) button next to the playbook name and select Start.
Duplicate a playbook
You can duplicate a playbook to reuse its configuration. From the playbook list, click the ⋮ menu at the end of the row and select Duplicate. You can also duplicate from inside an open playbook.
Import and export a playbook
Import a playbook
You can import a playbook from your own platform or from another platform. Navigate to Data > Processing > Automation, click Import, and select the playbook file.
Verify imported playbook configuration
Imported playbooks may reference data that does not exist in your platform. For example, the original playbook may have listened for a specific label or applied a marking definition that does not exist in your platform. After you import a playbook, check every component to confirm that all referenced data exists.
Data to verify after importing a playbook:
| Data attribute | Affected components | What to look for | Remediation |
|---|---|---|---|
| Labels | Listen knowledge events, Manual enrollment, Query knowledge on regular basis, Match knowledge, Reduce knowledge, Manipulate knowledge | Any label that does not exist in your platform appears as deleted | Create the missing label |
| Vocabularies | Listen knowledge events, Manual enrollment, Query knowledge on regular basis, Match knowledge, Reduce knowledge, Manipulate knowledge | Any vocabulary that does not exist in your platform appears as deleted | Create the missing vocabulary |
| Marking definitions | Listen knowledge events, Manual enrollment, Query knowledge on regular basis, Match knowledge, Reduce knowledge, Manipulate knowledge | Any marking definition that does not exist in your platform appears as deleted | Create the missing marking definition |
| Specific entity or observable | Listen knowledge events, Manual enrollment, Query knowledge on regular basis, Match knowledge, Reduce knowledge, Manipulate knowledge | Verify that the referenced entity or observable exists in your platform | Create the missing entity or observable |
| Author (identity) | Listen knowledge events, Manual enrollment, Query knowledge on regular basis, Match knowledge, Reduce knowledge, Manipulate knowledge | Verify that the referenced identity exists in your platform | Create the missing identity |
| Creator (user) | Listen knowledge events, Manual enrollment, Query knowledge on regular basis, Match knowledge, Reduce knowledge, Manipulate knowledge | Verify that the referenced user exists in your platform | Create the missing user |
| Connector | Enrich through connector | Verify that the connector exists and is active in your platform, copy the connector ID - this is found in the URL when viewing the connector's monitoring status | Create the connector or update the connector ID |
| Task template | Container wrapper | Verify that the task template exists in your platform | Create the missing task template |
| Notifier | Send to notifier | Verify that the notifier exists in your platform | Create the missing notifier |
| Target | Send to notifier | Verify that the target exists in your platform | Create the missing target |
Export a playbook
To share a playbook with someone on a different platform, or to troubleshoot a playbook issue, you can export it. From the playbook list, click the ⋮ menu at the end of the row and select Export. You can also export from inside an open playbook.
Monitor playbook activity
After you start a playbook, you can monitor its activity to verify that it runs as expected and to troubleshoot issues.
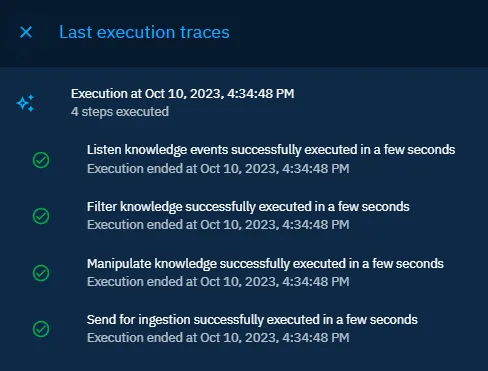
To view execution traces, open a playbook and click the execution traces icon in the upper-right corner. The panel displays the last 20 executions for up to 90 days. Each executed step shows the raw data produced at that point in the playbook.
Troubleshoot playbook execution
- Fewer steps than expected: If the execution trace shows fewer steps than your playbook contains, the playbook encountered an error and stopped early. For example, if your playbook has seven steps but only four appear in the trace, the playbook stopped at the fourth step.
- Test with temporary steps: If your playbook uses multiple components with different routes, add a temporary "Manipulate knowledge" step that applies a label. This helps you identify which route the bundle follows. Use this approach when the playbook output does not match your expectations.
- Check Manipulate knowledge execution traces: If the data does not change as expected, verify that the "Manipulate knowledge" step executed. If it did, open the execution trace details and confirm that the operation type (for example, add, replace, or remove), field, and value are correct. Also verify that the step scope targets the correct entities — either the triggering entity only, or all elements in the bundle.
Tips on creating playbooks
-
The criteria set on the trigger node for a playbook controls the playbook availability to users for manual enrollment. You can choose to add criteria to the trigger node so the playbook is only available in certain conditions (e.g. or only for indicator entities). Alternatively, you can choose to leave the trigger node criteria empty and add a match knowledge node below to allow users to run the playbook on any data.
-
It is possible to configure playbooks to run based on the output of a previous playbook, allowing you to chain multiple processes to automate your data processing needs. For example one playbook can add a label, such as ‘weekly digest’, which can then be used as the trigger criteria for a (weekly) scheduled query that then creates a new container with all ‘weekly digest’ entities added.
-
When drafting and testing a playbook consider adding a filter of Creator =
. This will mean you will be able to manually create data that can be used with the playbook and limit the likelihood of other users running the playbook before it is ready.
Useful tips for troubleshooting
- If fewer steps are shown than the number of components in your playbook, the execution stopped early due to an error.
- For playbooks with multiple routes, adding temporary manipulation steps (for example adding a label) can help identify which path the bundle is taking.
- For Manipulate Knowledge components, always verify:
- the operation type (add, replace, remove),
- the target field and value,
- the execution scope (triggering entity only vs all bundle entities).