Connectors
Introduction
Connectors list
You are looking for the available connectors? The list is in the XTM Hub Integrations Library.
Connectors are the cornerstone of the OpenCTI platform and allow organizations to easily ingest, enrich or export data. According to their functionality and use case, they are categorized in the following classes.
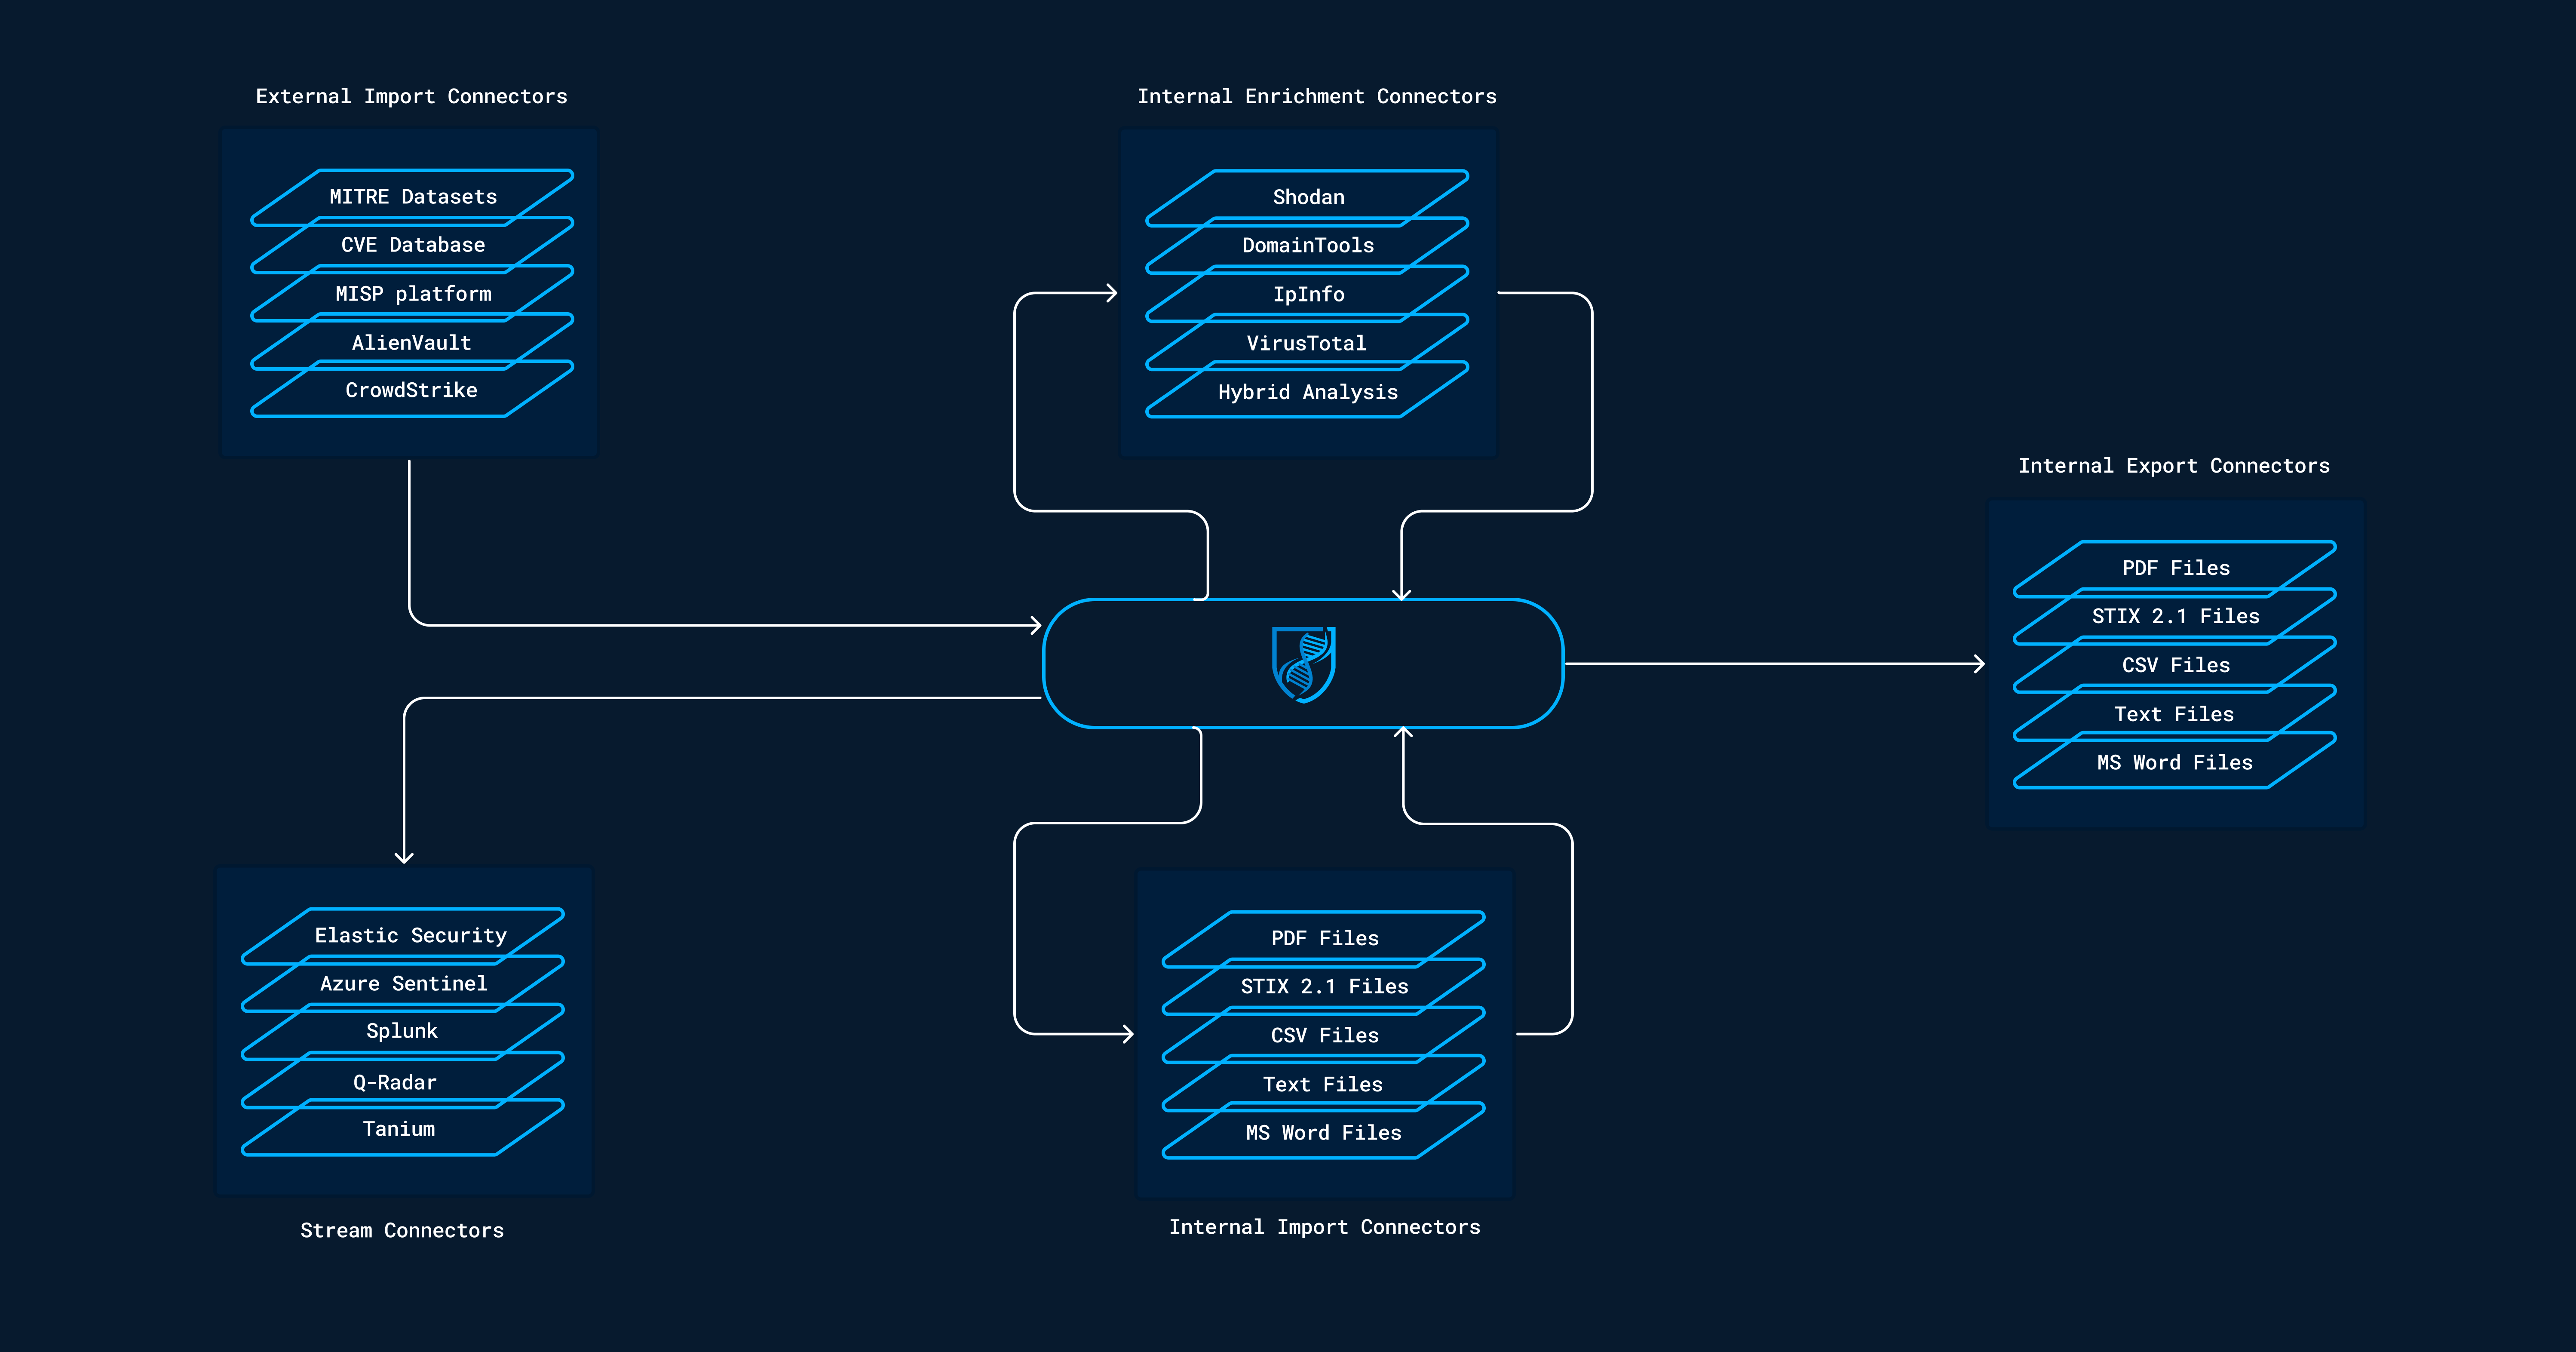
Import
These connectors automatically retrieve information from an external organization, application, or service, and convert it to STIX 2.1 bundles. Then, they import it into OpenCTI using the workers.
Enrichment
When a new object is created in the platform or on the user request, it is possible to trigger the internal enrichment connector to lookup and/or search the object in external organizations, applications, or services. If the object is found, the connectors will generate a STIX 2.1 bundle which will increase the level of knowledge about the concerned object.
Stream
These connectors connect to a platform live stream and continuously do something with the received events. In most cases, they are used to consume OpenCTI data and insert them in third-party platforms such as SIEMs, XDRs, EDRs, etc. In some cases, stream connectors can also query the external system on a regular basis and act as import connector for instance to gather alerts and sightings related to CTI data and push them to OpenCTI (bi-directional).
Import files
Information from an uploaded file can be extracted and ingested into OpenCTI. Examples are files attached to a report or a STIX 2.1 file.
Export files
Information stored in OpenCTI can be extracted into different file formats like .csv or .json (STIX 2.1).
Connector configuration
Connector users and tokens
All connectors have to be able to access the OpenCTI API. To allow this connection, they have 2 mandatory configuration parameters, the OPENCTI_URL and the OPENCTI_TOKEN.
Connectors tokens
Be careful, we strongly recommend to use a dedicated token for each connector running in the platform. So you have to create a specific user for each of them.
Also, if all connectors users can run with a user belonging to the Connectors group (with the Connector role), the Internal Export Files should be run with a user who is Administrator (with bypass capability) because they impersonate the user requesting the export to avoid data leak.
| Type | Required role | Used permissions |
|---|---|---|
| EXTERNAL_IMPORT | Connector | Import data with the connector user. |
| INTERNAL_ENRICHMENT | Connector | Enrich data with the connector user. |
| INTERNAL_IMPORT_FILE | Connector | Import data with the connector user. |
| INTERNAL_EXPORT_FILE | Administrator | Export data with the user who requested the export. |
| STREAM | Connector | Consume the streams with the connector user. |
Parameters
In addition to these 2 parameters, connectors have other mandatory parameters that need to be set in order to get them work.
Here is an example of a connector docker-compose.yml file:
- CONNECTOR_ID=ChangeMe
- CONNECTOR_TYPE=EXTERNAL_IMPORT
- CONNECTOR_NAME=MITRE ATT&CK
- CONNECTOR_SCOPE=identity,attack-pattern,course-of-action,intrusion-set,malware,tool,report
- CONNECTOR_LOG_LEVEL=info
Here is an example in a connector config.yml file:
connector:
  id: 'ChangeMe'
  type: 'EXTERNAL_IMPORT'
  name: 'MITRE ATT&CK'
  scope: 'identity,attack-pattern,course-of-action,intrusion-set,malware,tool,report'
  log_level: 'info'
Advanced parameters
Overwrite RabbitMQ config
The connection to RabbitMQ is done by using parameters and credentials directly given by the platform during the connector registration process. In some cases, you may need to override them.
Here is an example of a connector docker-compose.yml file:
- MQ_HOST=rabbit.mydomain.com
- MQ_PORT=5672
- MQ_VHOST=/
- MQ_USE_SSL=false
- MQ_USER=guest
- MQ_PASS=guest
Here is an example in a connector config.yml file:
Send data to API (HTTP) instead of RabbitMQ
By default, some connectors are connecting to RabbitMQ in order to push knowledge / data to the platform. In some cases, you may like the connector to send data directly through HTTP (for instance, if they cannot connect to RabbitMQ).
Applicable connectors
This config applies to connectors with the following types: EXTERNAL_IMPORT, INTERNAL_ENRICHMENT and INTERNAL_IMPORT_FILE. Indeed, enrichment connectors are both listening for enrichment jobs and then sending enrichment results.
Here is an example of a connector docker-compose.yml file:
- CONNECTOR_QUEUE_PROTOCOL=api # Use api to send bundle through HTTP query to the API, amqp (default) to send to rabbit
Here is an example in a connector config.yml file:
connector:
  queue_protocol: 'api' # Use api to send bundle through HTTP query to the API, amqp (default) to send to rabbit
STIX bundles size limit
Currently the connector cannot send bundle larger the the configuration of the OpenCTI backend (default 50Mb). This configuration can be changed using the parameter APP__MAX_PAYLOAD_BODY_SIZE=50mb on the platform side.
Listening data / jobs using HTTP instead of RabbitMQ
By default, some connectors are connecting to RabbitMQ in order to listen for jobs (enrichment, export) and eventually associated data to enrich / process. In some cases, you may like the connector to listen data directly on an HTTP endpoint (for instance, if they cannot connect to RabbitMQ).
Applicable connectors
This config applies to connectors with the following types: INTERNAL_ENRICHMENT and INTERNAL_EXPORT_FILE.
When using this mode, the connector will start an HTTP server and will listen for bundle / jobs on this endpoint. The platform (workers) will then send the bundle directly to this HTTP endpoint instead of sending this to the RabbitMQ queue.
To put the connector in this mode, you have to set the following parameter:
Here is an example of a connector docker-compose.yml file:
- CONNECTOR_LISTEN_PROTOCOL=api # Launch an HTTP server on the connector side to listen jobs / bundle sent by OpenCTI, amqp (default) to connect to RabbitMQ queue
Here is an example in a connector config.yml file:
connector:
  listen_protocol: 'api' # Launch an HTTP server on the connector side to listen jobs / bundle sent by OpenCTI, amqp (default) to connect to RabbitMQ queue
Once this is set, you have a few more parameters to be able to customize the HTTP server and the behavior of the connector.
Info
The connector will declare all the parameters to the platform the registering so you can customize them without touching anything in the platform configuration.
| Parameter (yml) | Environment variable | Default value | Description |
|---|---|---|---|
| connector:listen_protocol_api_port | CONNECTOR_LISTEN_PROTOCOL_API_PORT | 7070 | Port of the listening HTTP server |
| connector:listen_protocol_api_path | CONNECTOR_LISTEN_PROTOCOL_API_PATH | /api/callback | URI (path) where the HTTP query will be sent by the platform |
| connector:listen_protocol_api_uri | CONNECTOR_LISTEN_PROTOCOL_API_URI | http://127.0.0.1:7070 | The full URL (excluding the path) used by the platform to send the HTTP query. |
| - | - | - | - |
| connector:listen_protocol_api_ssl | CONNECTOR_LISTEN_PROTOCOL_API_SSL | false |
Launch the HTTP server in TLS mode |
| connector:listen_protocol_api_ssl_key | LISTEN_PROTOCOL_API_SSL_KEY | SSL Key for TLS mode | |
| connector:listen_protocol_api_ssl_cert | LISTEN_PROTOCOL_API_SSL_CERT | SSL Cert for TLS mode | |
| connector:listen_protocol_api_ssl_passphrase | LISTEN_PROTOCOL_API_SSL_PASSPHRASE | Optional passphrase for the SSL key |
In this mode, the platform will use the workers to send the HTTP queries to the connectors declared in this mode, we have added a few worker configuration parameters to help with those queries. The following configuration is for the workers and is generally not needed.
| Parameter (yml) | Environment variable | Default value | Description |
|---|---|---|---|
| worker:listen_api_ssl_verify | WORKER_LISTEN_API_SSL_VERIFY | Verify SSL certificate when sending data to HTTP mode connectors | |
| worker:listen_api_http_proxy | WORKER_LISTEN_API_HTTP_PROXY | Use a proxy to send the data to HTTP mode connectors | |
| worker:listen_api_https_proxy | WORKER_LISTEN_API_HTTPS_PROXY | Use a proxy to send the data to HTTP mode connectors (SSL). |
Examples for enrichment connectors in full HTTP mode
Enrichment connectors are the only connectors that are both listening jobs / bundles and then sending back new data / knowledge to the platform. If you need to use those connectors in full HTTP mode, here is the example of config:
Here is an example of a connector docker-compose.yml file:
- CONNECTOR_QUEUE_PROTOCOL=api # Use api to send bundle through HTTP query to the API, amqp (default) to send to rabbit
- CONNECTOR_LISTEN_PROTOCOL=api # Launch an HTTP server on the connector side to listen jobs / bundle sent by OpenCTI, AMQP (default) to connect to RabbitMQ queue
- CONNECTOR_LISTEN_PROTOCOL_API_PORT=80
- CONNECTOR_LISTEN_PROTOCOL_API_URI=http://myconnector.myorganization.com
Here is an example in a connector config.yml file:
connector:
  queue_protocol: 'api' # Use api to send bundle through HTTP query to the API, amqp (default) to send to rabbit
  listen_protocol: 'api' # Launch an HTTP server on the connector side to listen jobs / bundle sent by OpenCTI, AMQP (default) to connect to RabbitMQ queue
  listen_protocol_port: 80
  listen_protocol_api_uri: 'http://myconnector.myorganization.com'
In this configuration, the platform (workers) will automatically send enrichment request to http://myconnector.myorganization.com and the connector will send bundle back using the HTTP API. The connector will then never try to connect to RabbitMQ.
Networking
Be aware that all connectors are reaching RabbitMQ based the RabbitMQ configuration provided by the OpenCTI platform. The connector must be able to reach RabbitMQ on the specified hostname and port. If you have a specific Docker network configuration, please be sure to adapt your docker-compose.yml file in such way that the connector container gets attached to the OpenCTI Network, e.g.:
Connector token
Create the user
As mentioned previously, it is strongly recommended to run each connector with its own user. The Internal Export File connectors should be launched with a user that belongs to a group which has an “Administrator” role (with bypass all capabilities enabled).
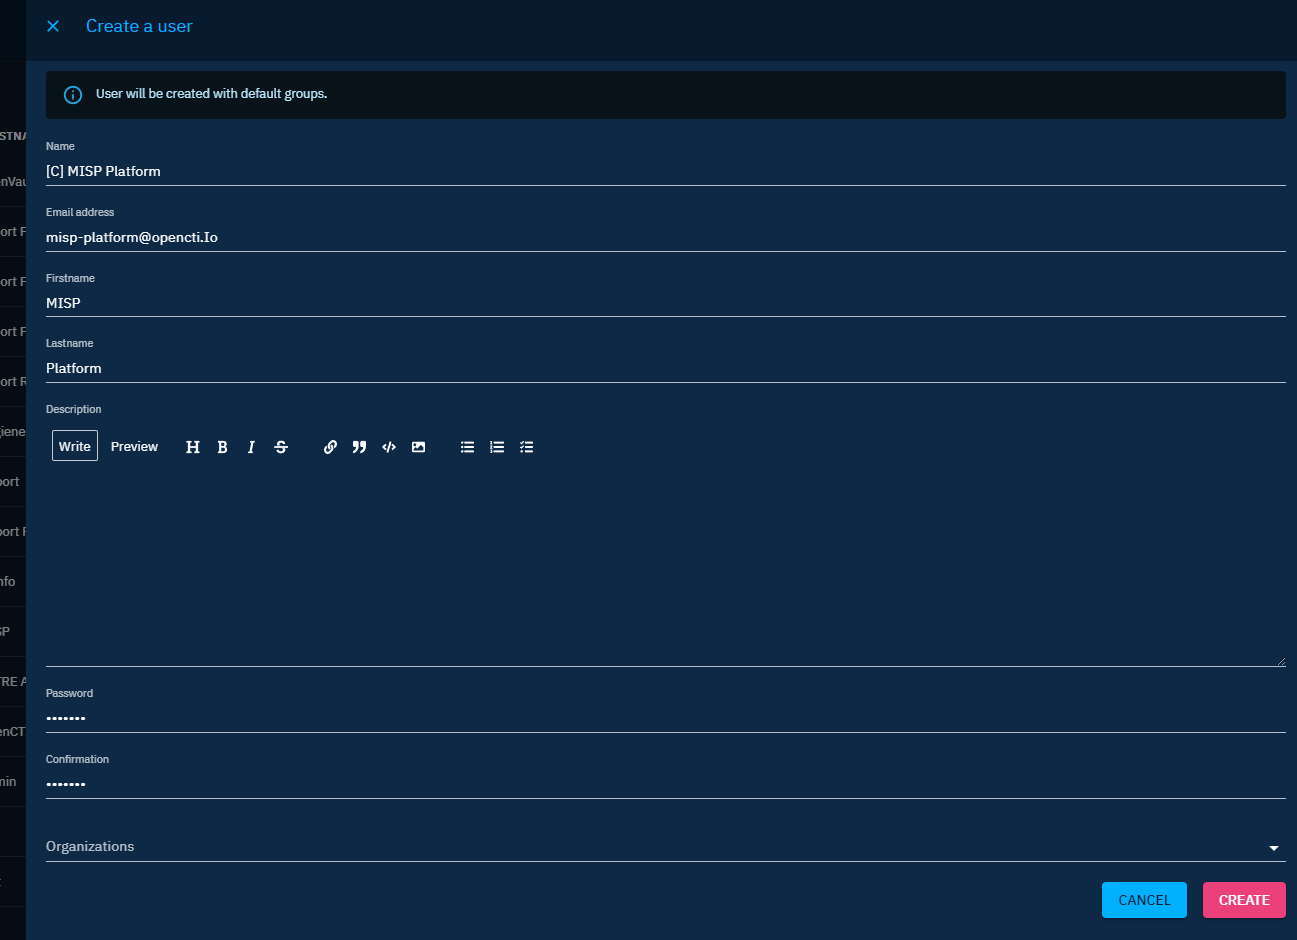
By default, in platform, a group named "Connectors" already exists. So just create a new user with the name [C] Name of the connector in Settings > Security > Users.
Put the user in the group
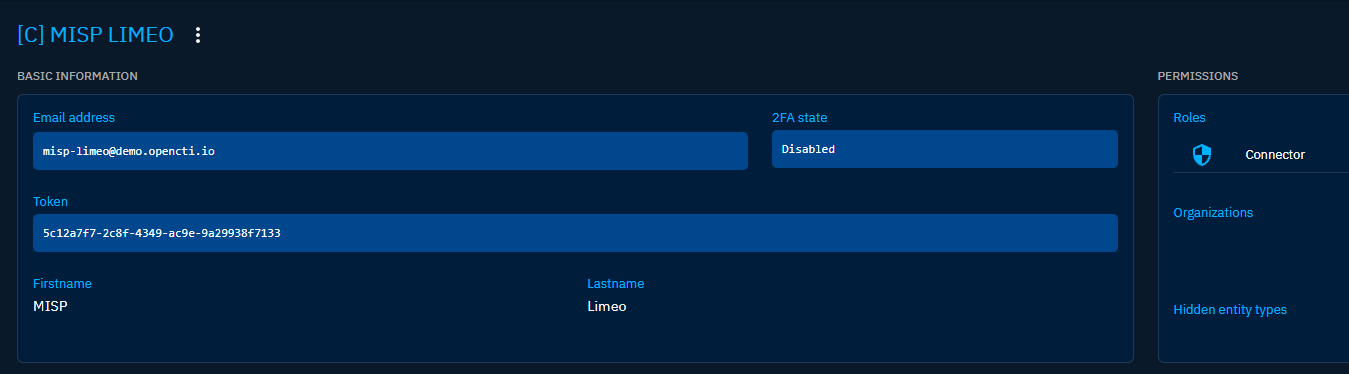
Just go to the user you have just created and add it to the Connectors group.

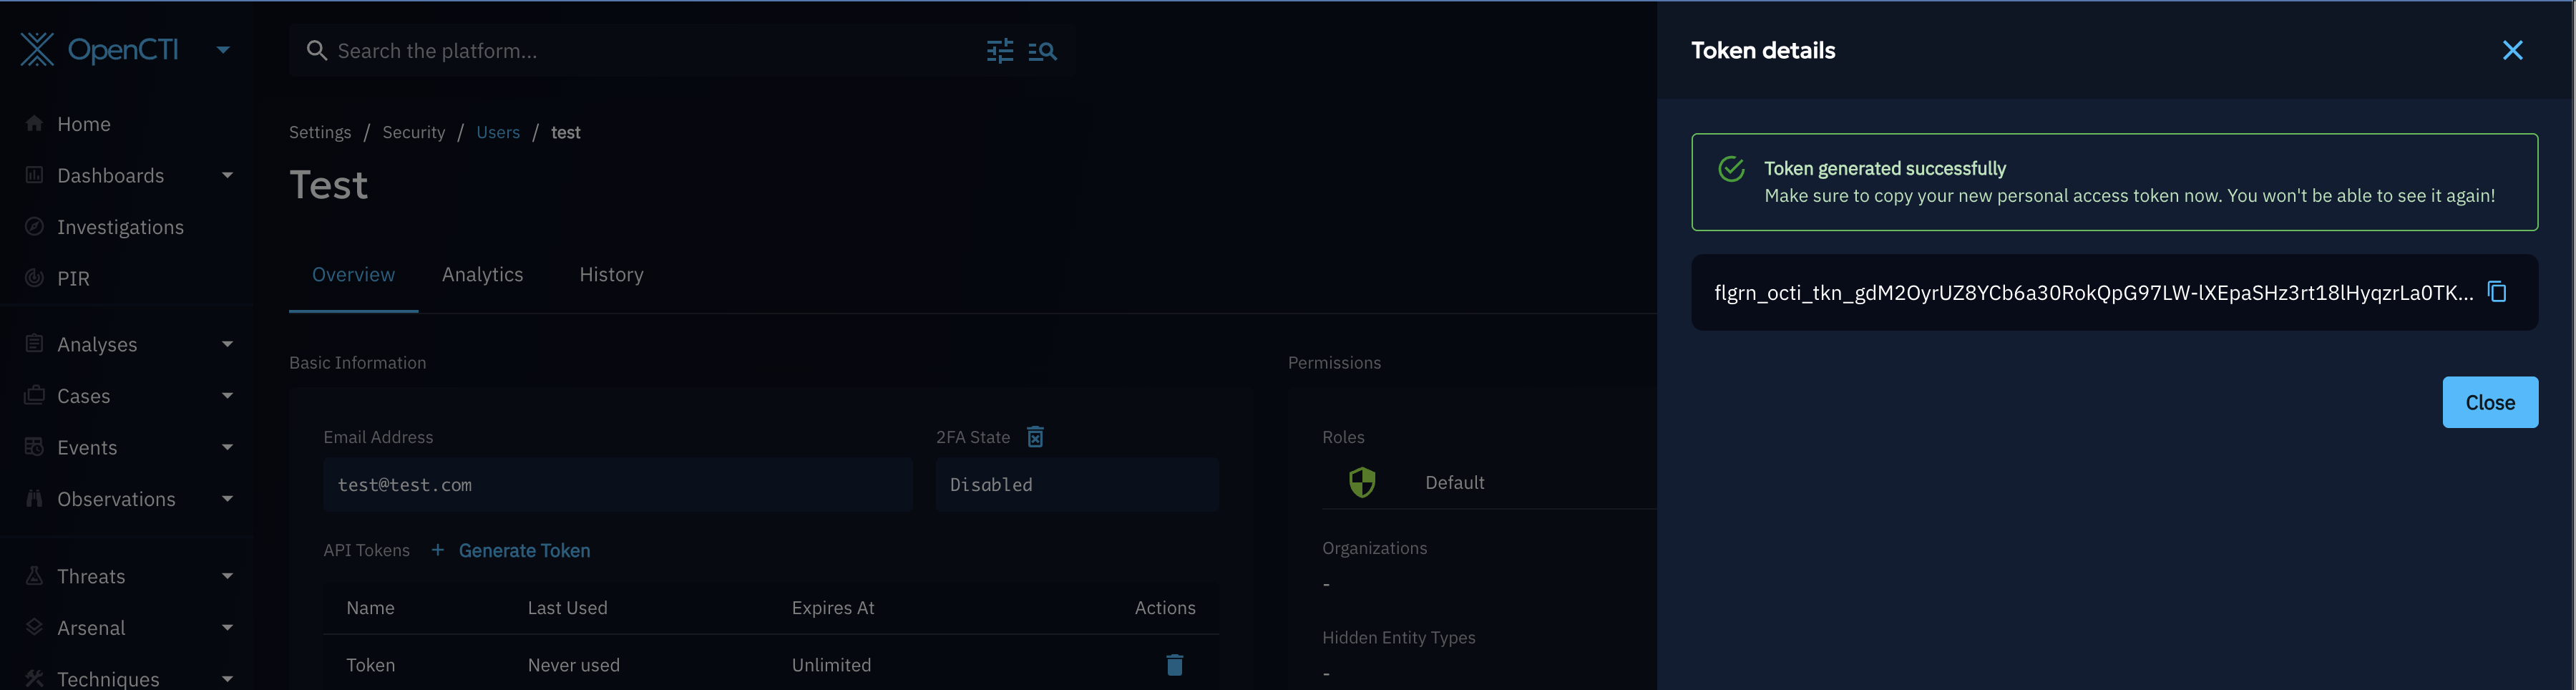
Then create a user token in the interface.
Stateless connections
The user associated with the connector will be used to authenticate to the platform GraphQL API using a dedicated short time period JWT token. Please note that, since OpenCTI 6.6.0, token-based connections will never create persistent user sessions in the platform. This is no longer an option "stateless mode" that can be set manually from the user's configuration page.
Docker activation
You can either directly run the Docker image of connectors or add them to your current docker-compose.yml file.
Add a connector to your deployment
For instance, to enable the MISP connector, you can add a new service to your docker-compose.yml file:
  connector-misp:
    image: opencti/connector-misp:latest
    environment:
      - OPENCTI_URL=http://localhost
      - OPENCTI_TOKEN=ChangeMe
      - CONNECTOR_ID=ChangeMe
      - CONNECTOR_TYPE=EXTERNAL_IMPORT
      - CONNECTOR_NAME=MISP
      - CONNECTOR_SCOPE=misp
      - CONNECTOR_LOG_LEVEL=info
      - MISP_URL=http://localhost # Required
      - MISP_KEY=ChangeMe # Required
      - MISP_SSL_VERIFY=False # Required
      - MISP_CREATE_REPORTS=True # Required, create report for MISP event
      - MISP_REPORT_CLASS=MISP event # Optional, report_class if creating report for event
      - MISP_IMPORT_FROM_DATE=2000-01-01 # Optional, import all event from this date
      - MISP_IMPORT_TAGS=opencti:import,type:osint # Optional, list of tags used for import events
      - MISP_INTERVAL=1 # Required, in minutes
    restart: always
Launch a standalone connector
To launch a standalone connector, you can use the docker-compose.yml file of the connector itself. Just download the latest release and start the connector:
$ wget https://github.com/OpenCTI-Platform/connectors/archive/{RELEASE_VERSION}.zip
$ unzip {RELEASE_VERSION}.zip
$ cd connectors-{RELEASE_VERSION}/misp/
Change the configuration in the docker-compose.yml according to the parameters of the platform and of the targeted service. Then launch the connector:
Manual activation
If you want to manually launch connector, you just have to install Python 3 and pip3 for dependencies:
Download the release of the connectors:
$ wget <https://github.com/OpenCTI-Platform/connectors/archive/{RELEASE_VERSION}.zip>
$ unzip {RELEASE_VERSION}.zip
$ cd connectors-{RELEASE_VERSION}/misp/src/
Install dependencies and initialize the configuration:
Change the config.yml content according to the parameters of the platform and of the targeted service and launch the connector:
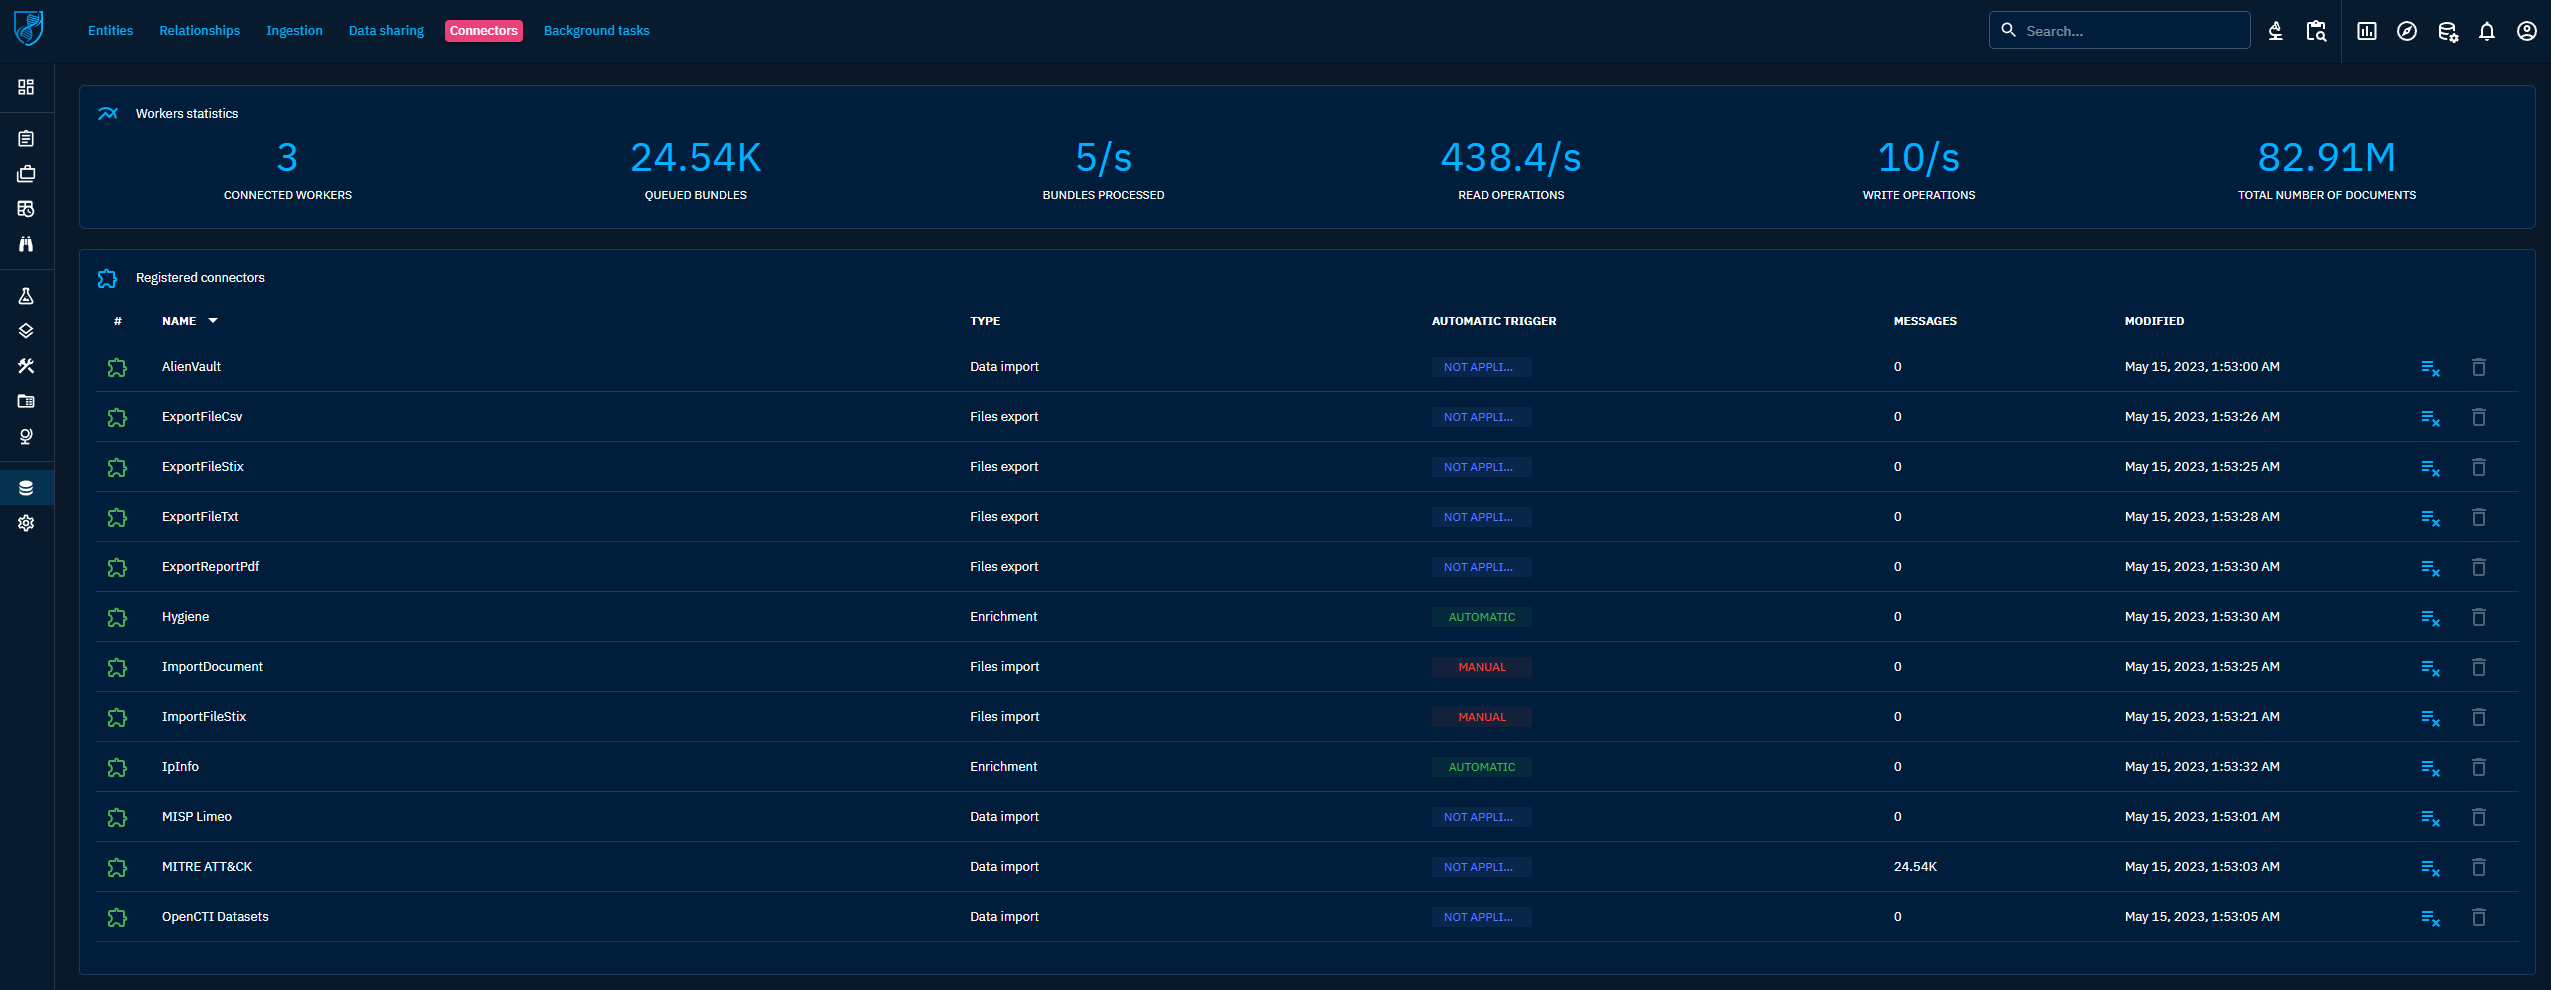
Connectors status
The connector status can be displayed in the dedicated section of the platform available in Data > Ingestion > Connectors. You will be able to see the statistics of the RabbitMQ queue of the connector:
Problem
If you encounter problems deploying OpenCTI or connectors, you can consult the troubleshooting page.