Manage authentication strategies via the graphical interface
Enterprise edition
Please read the information below. The ability to log in via SSO is covered by the OpenCTI Enterprise Edition license.
All the configurations listed below require an Enterprise Edition to work, except the Local strategy.
Capability required to manage authentication strategies
To access the Authentication screen, you need to have the Manage Authentication capability.
Supported Strategies
Via the UI, you can configure the following strategies:
- Local with login/password
- HTTP headers
- Certificate
- LDAP (multiple instances are possible)
- OpenID (multiple instances are possible)
- SAML (multiple instances are possible)
The Authentication screen will allow you to create new strategies, but some will already be present on your screen:
- Local Strategy
- HTTP Headers
- Certificate (disabled by default since it requires that your platform expose directly an HTTPS endpoint)
Any authentication can be edited, enabled, disabled or even deleted (except Local, HTTP Headers and Certificate).
Manage platform authentication policies
Any configuration related to authentication policy is now managed in the authentication screen.
Two-factor authentication
The "Enforce Two-Factor Authentication" button is available, allowing administrators to mandate 2FA activation for users, enhancing overall account security.
Max concurrent sessions
It is possible to specify the amount of concurrent sessions allowed on your platform. By default, there is no limit (0 means that there is no maximum number of sessions). If you want to restrict it, simply replace this value by the amount of concurrent sessions you want to allow on OpenCTI.
Create a new configuration
When navigating to Parameters / Authentications, you will land on a screen to manage your authentication strategies.
Click on the button to create a new strategy. Only the following strategies will be available:
- LDAP
- OpenID
- SAML
Each configuration has some mandatory fields. Once these are provided, you will be able to create your configuration. Providing a group mapping or an org mapping is not mandatory to create your authentication.
By default, a created authentication will be enabled, meaning it will be visible on your login screen. You can update this behavior by toggling off the field in the creation form.
Specificities per Configuration
Local Authentication
Local authentication is the authentication with Username & password. This authentication is unique, meaning that you cannot create a new one.
Enable/Disable local authentication
The authentication can be disabled. If the authentication is disabled, it means that the form to enter username & password will not be present within UI.
Please be careful before disabling it:
- you should ensure that you have at least another authentication working (meaning that not only you get successfully authenticated, but that both your group mapping & organization mapping are correct) before disabling it.
Define password policy
By clicking on the local authentication you can manage your local password policies. Administrators can specify requirements such as minimum/maximum number of characters, symbols, digits, and more to ensure robust password security across the platform. Here are all the parameters available:
| Parameter | Description |
|---|---|
Number of chars must be greater than or equals to |
Define the minimum length required for passwords. |
Number of chars must be lower or equals to (0 equals no maximum) |
Set an upper limit for password length. |
Number of symbols must be greater or equals to |
Specify the minimum number of symbols required in a password. |
Number of digits must be greater or equals to |
Set the minimum number of numeric characters in a password. |
Number of words (split on hyphen, space) must be greater or equals to |
Enforce a minimum count of words in a password. |
Number of lowercase chars must be greater or equals to |
Specify the minimum number of lowercase characters. |
Number of uppercase chars must be greater or equals to |
Specify the minimum number of uppercase characters. |
Password validity duration in days (0 equals unlimited) |
Define how long a password remains valid before the user is forced to change it. A value of 0 means passwords never expire. |
HTTP headers
Unless this authentication strategy was defined before migrating, it should be disabled by default. To enable it, simply toggle it on via the toggle present in the drawer and edit all the fields according to your needs.
Client Certificate
Unless this authentication strategy was defined before migrating, it should be disabled by default.
To enable it, you need your platform to be set up to work with HTTPS.
OpenID
For OpenID, the following fields are mandatory (indicated with a "*" in the form):
- A configuration name, allowing you to differentiate between two configurations of the same type. Please note that the configuration name will also be used as the name present on the Login button.
- Issuer: the issuer of the OpenID response, generally the URI of your Identity Provider
- Client ID: The ID of your client access on the Identity Provider
- Client secret: The secret of your client access on the Identity Provider
SAML
For SAML, the following fields are mandatory (indicated with a "*" in the form):
- A configuration name, allowing you to differentiate between two configurations of the same type. Please note that the configuration name will also be used as the name present on the Login button.
- Issuer: the issuer of the SAML response, generally the URI of your Identity Provider
- IdP certificate: using PEM format, it is used to validate the SAML response. Depending on the certificate format, it may include the header, footer, and newline (\n) characters
- SAML URL (entry point): the URL of your Identity Provider where the SAML request will be sent to (format may vary depending on the IdP)
The Private key (PEM format) is optional and is only required if you want to sign the SAML client request.
Sign your SAML authentication requests
Signing your SAML authentication requests means that OpenCTI (the Service Provider, or SP) cryptographically signs the AuthnRequest (and LogoutRequest/LogoutResponse) it sends to your Identity Provider (IdP), using a private key. The IdP then verifies this signature using the matching public certificate, ensuring the request genuinely came from your OpenCTI instance and was not tampered with.
In the SAML configuration form, under the Security & Signing section, fill in the following fields:
| Field | Description |
|---|---|
Private key |
The private key (PEM format), used to sign outgoing requests. This is a secret that is stored encrypted in the database. |
Signing certificate |
The public certificate (PEM format) matching the private key above. This certificate is what you must also register on your IdP so it can verify the signature. |
Signature algorithm |
The algorithm used to sign the request, for example sha256. It must match what your IdP expects. |
Digest algorithm |
The algorithm used to hash the signed content, for example sha256. |
SSO Binding type |
In 'Request behavior' section. How the signed request is transmitted to the IdP: HTTP-Redirect (signature passed as query string parameters) or HTTP-POST (signature embedded in the posted XML). Choose the binding your IdP expects for authentication requests. |
Note that for Private key and Signing certificate PEM, there is 2 way to use them:
-
multiline: it must start by the
-----BEGINand ends with-----END, and keep the return character. Example (key truncated for brevity):-----BEGIN PRIVATE KEY----- MIIEvgIBADANBgkqhkiG9w0BAQEFAASCBKgwggSkAgEAAoIBAQDnxI0CWT26SJzC kRYdcnrfaqiCcQpHzHg7AU5pF+gUjlRGDqy/O/ryEwNEmuwfaXuojaQoRA692ukR aSEDhCRue+esK3FUelH0SzleWxWMyzMwOZiB+DAOMo27qCI2tiFq0TU4+i1VKmO4 HC7G+/saFoXs9cVdVEukGXEmPEp2wcU9xwUauErtgT9njEzDHS4iIm3v9RKcWT28 ... MM4dRhXugVQ22dWdMFNwTsowiVI7PU0nqk16H3EXAoGBAJ9qNVivHHHp0WiuIMfy UiB18zFRgisBvbs4GMnEziK+tWzp5aU2qAgYPOn8zM71zl9Pg3bRqQveuXGG27rP hXy+MTsgc/QblhVxnE8R/uK3zRFKrjtwEKOK3ixCmavZpzsabsYCmsF9YJxgvVYo favy+noqpadMb94wlHlvWqua -----END PRIVATE KEY----- -
one line: it can be store as one line but the whole
-----BEGINand-----ENDlines should be removed. Example (text is cut in the middle):
You can also control how OpenCTI validates the IdP's response using:
Want assertion signed: require the SAML assertion returned by the IdP to be signed.Want authn response signed: require the whole SAML response returned by the IdP to be signed.
Certificates
Be careful to specify the IdP certificate and Private key using PEM format. Many systems export keys in X.509 or PKCS12 format, so you may need to convert them.
Here is an example to extract PEM from PKCS12:
Troubleshooting a signature error
If your IdP rejects the request with a signature-related error:
- Double-check that the certificate registered on the IdP is exactly the same as the
Signing certificateconfigured in OpenCTI (compare their SHA-256 fingerprints withopenssl x509 -in signing-cert.pem -noout -fingerprint -sha256), and ensure that this certificate corresponds to the configuredPrivate key. - Confirm the
Signature algorithmconfigured in OpenCTI matches what the IdP expects. - Confirm the
SSO Binding typematches the binding your IdP is configured to accept. - If the request is rejected with an error about an unknown or invalid requester (client not found), verify that the
Issuervalue exactly matches the client/application identifier registered on your IdP, and that this client exists in the correct realm/tenant.
Encrypt the SAML assertions
Encrypting SAML assertions means that your Identity Provider (IdP) encrypts the user identity and attributes it returns, so that only OpenCTI can read them. This protects sensitive user data if the SAML response transits through the user's browser.
Encryption always applies to the Identity Provider to OpenCTI direction: the IdP encrypts the assertion using your public certificate, and OpenCTI decrypts it using the matching private key. The authentication request sent by OpenCTI to the IdP is never encrypted, since it contains no confidential data.
In the SAML configuration form, under the Security & Signing section, fill in the following fields:
| Field | Description |
|---|---|
Decryption private key |
The private key (PEM format) used to decrypt the encrypted assertions sent by the IdP. This is a secret that is stored encrypted in the database. It is mandatory to enable decryption. |
Decryption certificate |
The public certificate (PEM format) matching the private key above. OpenCTI does not use it to decrypt: you must provide it to your IdP so it can encrypt the assertions. It can be added in SAML request metadata. |
The same PEM formatting rules as for the signing fields apply (multiline with -----BEGIN/-----END, or a single line without the header and footer).
On the IdP side, select algorithms supported by OpenCTI:
| Setting | Supported values |
|---|---|
| Assertion encryption | AES-128-CBC, AES-256-CBC, AES-128-GCM, AES-256-GCM |
| Key encryption (key wrap) | RSA-OAEP-MGF1P (recommended), RSA-v1.5 (deprecated, avoid unless required) |
Troubleshooting a decryption error
If the login fails after the IdP has authenticated the user, with a decryption-related error:
key encryption algorithm ... not supported: your IdP uses a key encryption algorithm that OpenCTI does not support. Try another one, for exampleRSA-OAEP-MGF1Pon the IdP.oaep decoding error: either theDecryption private keydoes not match the certificate registered on the IdP, or the OAEP digest used by the IdP is not the expected one. Try another digest algorithm, for example set the OAEP digest toSHA-1on the IdP.encryption algorithm ... not supported: select one of the supported assertion encryption algorithms listed above.
LDAP
For LDAP, the following fields are mandatory:
- A configuration name, allowing you to differentiate between two configurations of the same type. Please note that the configuration name will also be used as the name present on the Login button.
- LDAP URL: the LDAP server URL
- Bind DN: distinguished name of the user to bind to
- Bind credentials: the password of the user to bind to
- Search base: the base DN from which to search for users
- Search filter: the LDAP filter used to find the user based on the username provided at login. Generally, a simple filter looks like
mail={{username}}where{{username}}is replaced by the username provided at login. - Group search base: the base DN from which to search for groups
- Group search filter: the LDAP filter used to find the groups of the user based on the username provided at login. Generally, a simple filter looks like
member={{dn}}where{{dn}}is replaced by the distinguished name of the user found with the previous search filter.
Add a custom field not present in SAML, LDAP, OpenID
The UI covers the most commonly used configuration. However, for specific use cases, you might need to add a custom field that is not present in the UI. Custom fields are directly bound to the underlying authentication library we use (passport). This means that any field supported by the passport library can be added as a custom field in the UI.
In each form, you can use the Extra Configuration section to add a new custom field: - Click on the "+" to add a new field - Specify a field type - Add a key (the name of the field in the passport library to map to) - Add a value
Secrets management
Authentication providers may need secrets (e.g. OIDC client secret, SAML private key, LDAP bind credentials, ...). You can either store the value in the database (with encryption) or reference an external secret by name.
Stored secrets (database)
When you choose "Set a new secret" in the UI, the value is saved in the database and encrypted at rest. The platform global encryption key is used to encrypt and decrypt; the cleartext is never stored.
External secrets (environment or external provider)
Instead of storing a value, you can reference a secret by name from a global secrets registry defined in your configuration. In the UI this is "Use external secret": you pick a name from the list of available secrets. The provider then stores only that name; the secret is not stored in the database (neither encrypted nor in cleartext).
The registry is defined under the secrets key in your configuration file (or via the corresponding environment variables). Each entry is a named secret that can be supplied in one of two ways:
-
Direct value (environment)
Set the environment variableSECRETS__<NAME>__VALUE. The platform will list this in the UI with provider name "env". -
External credentials provider
Set the environment variableSECRETS__<NAME>__CREDENTIALS_PROVIDER__SELECTORto a supported provider identifier (e.g.cyberark). The UI shows the provider name (e.g. "cyberark") next to the secret name.
Example: external secret with Cyberark
To use a secret stored in Cyberark (e.g. for an OIDC client secret), define a named secret via environment variables and point it to Cyberark. You can then choose that secret in the UI when configuring the provider (Use external secret).
# Use Cyberark as the source for the secret named "oidc_client_secret"
SECRETS__OIDC_CLIENT_SECRET__CREDENTIALS_PROVIDER__SELECTOR=cyberark
SECRETS__OIDC_CLIENT_SECRET__CREDENTIALS_PROVIDER__CYBERARK__URI=https://your-cyberark-api/Account/GetPassword
SECRETS__OIDC_CLIENT_SECRET__CREDENTIALS_PROVIDER__CYBERARK__APP_ID=your-app-id
SECRETS__OIDC_CLIENT_SECRET__CREDENTIALS_PROVIDER__CYBERARK__SAFE=your-safe
SECRETS__OIDC_CLIENT_SECRET__CREDENTIALS_PROVIDER__CYBERARK__OBJECT=your-object

# Map the first (and only) value returned by Cyberark to the provider field "client_secret"
SECRETS__OIDC_CLIENT_SECRET__CREDENTIALS_PROVIDER__CYBERARK__FIELD_TARGETS=client_secret

# Optional: separator used to split the value returned by Cyberark (default is ":")
# SECRETS__OIDC_CLIENT_SECRET__CREDENTIALS_PROVIDER__CYBERARK__DEFAULT_SPLITTER=:
The secret name (oidc_client_secret in this example) will appear in the Use external secret dropdown. After selecting it for your provider, the platform fetches the value from Cyberark at runtime when the strategy is loaded.
Group mapping
Now that a configuration is defined, you can define the group mapping for all authentications (except Local).
All authentications have these options: - Prevent platform default group association: in OpenCTI you can allow some groups to be granted by default at user creation. This option allows you to define whether you want any new user created through the defined authentication to get these default groups granted by default. By default, users will be granted platform default group. - Auto create groups: you can decide to automatically create the groups that you have mapped. Please be aware that a group requires a role for a user to have rights (more information). When performing group mapping, you can enable an option to automatically create specific groups within OpenCTI. - Extend platform groups: you can decide to have the system retain groups set within OpenCTI that aren't managed by the authentication provider. This option allows you to manage assigning users to groups that are specific to OpenCTI and not have the groups overwritten when the user logs in.
Then for each authentication, you need to provide: - the group expression: identification of where to find the group information - the group splitter: if the group information contains multiple groups, this splitter character will be used to extract the individual group names - the group mapping: the mapping between the value of the group in your provider and the groups that exist in the platform. Be sure to type the exact same group name as it exists in the platform to avoid group duplication.
Organization mapping
For any authentication strategy (except Local), you can define the organization mapping, meaning to which organization in OpenCTI you want your users to belong when they will log in.
Organization mapping allows you to automatically create the organizations you have mapped. This option is disabled by default.
The behavior is similar to group mapping: you need to provide
-
the organization expression: identification of where to find the organization information
-
the organization splitter: if the organization information contains multiple organizations, this splitter character will be used to extract the individual organization names
-
the organization mapping: the mapping between the value of the organization in your provider and the organizations that exist in the platform. Be sure to type the exact same organization name as it exists in the platform to avoid organization duplication.
End-to-end example: OpenID Connect with group mapping
The following example walks through a complete OIDC configuration where the Identity Provider (IdP) returns group membership inside the ID token using a custom claim. This is a common pattern with providers such as Auth0, Azure AD, or Okta.
Context
When a user authenticates, the IdP returns a JSON object (the user_info). Inspect this payload via the authentication logs to understand which claims are available and where your group information is located.
A typical user_info response looks like:
{
  "sub": "waad|<tenant>|<user-id>",
  "given_name": "Jane",
  "family_name": "Doe",
  "name": "Jane Doe",
  "email": "jane.doe@example.com",
  "email_verified": true,
  "https://your-idp.example.com/groups": [
    "Engineering",
    "Product"
  ],
  "<platform-tenant-id>_groups": [
    "Admin"
  ]
}
Custom claims
Standard OIDC claims (email, name, given_name, family_name) are available directly under user_info. Custom claims added by your IdP — such as group membership — are usually namespaced (e.g. https://your-idp.example.com/groups) or prefixed with a tenant identifier (e.g. <platform-tenant-id>_groups). Use the authentication logs to find the exact claim path.
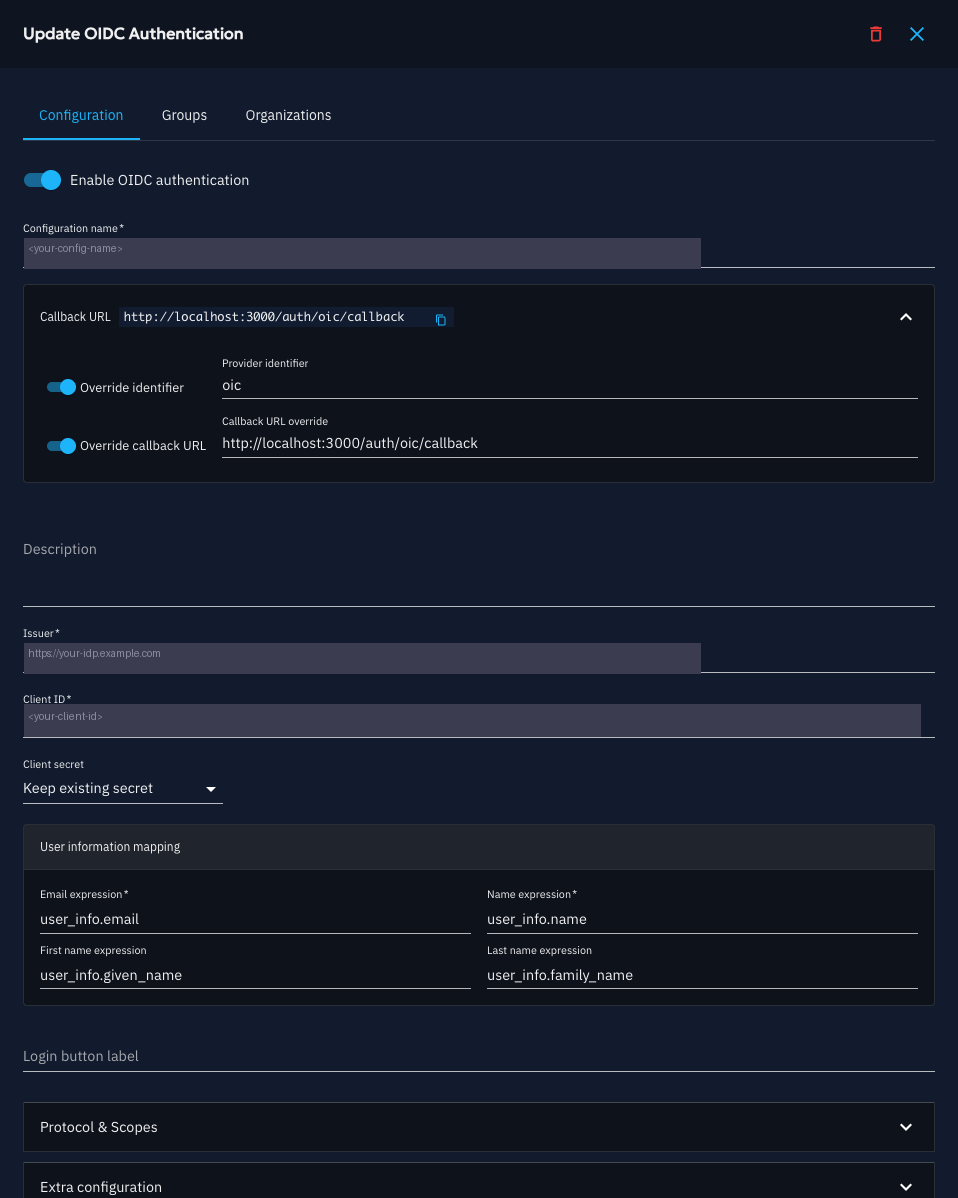
Step 1 – Configure the OIDC provider (Configuration tab)
Fill in the mandatory fields and map the standard user attributes:
| Field | Example value | Notes |
|---|---|---|
| Configuration name | Login with MyIdP |
Appears on the login button |
| Issuer | https://your-idp.example.com |
The Identity Provider base URL |
| Client ID | <your-client-id> |
Application client ID from your IdP |
| Client secret | <your-client-secret> |
Set or reference an external secret |
| Email expression | user_info.email |
Standard OIDC claim |
| Name expression | user_info.name |
Standard OIDC claim |
| First name expression | user_info.given_name |
Standard OIDC claim |
| Last name expression | user_info.family_name |
Standard OIDC claim |
Step 2 – Map groups (Groups tab)
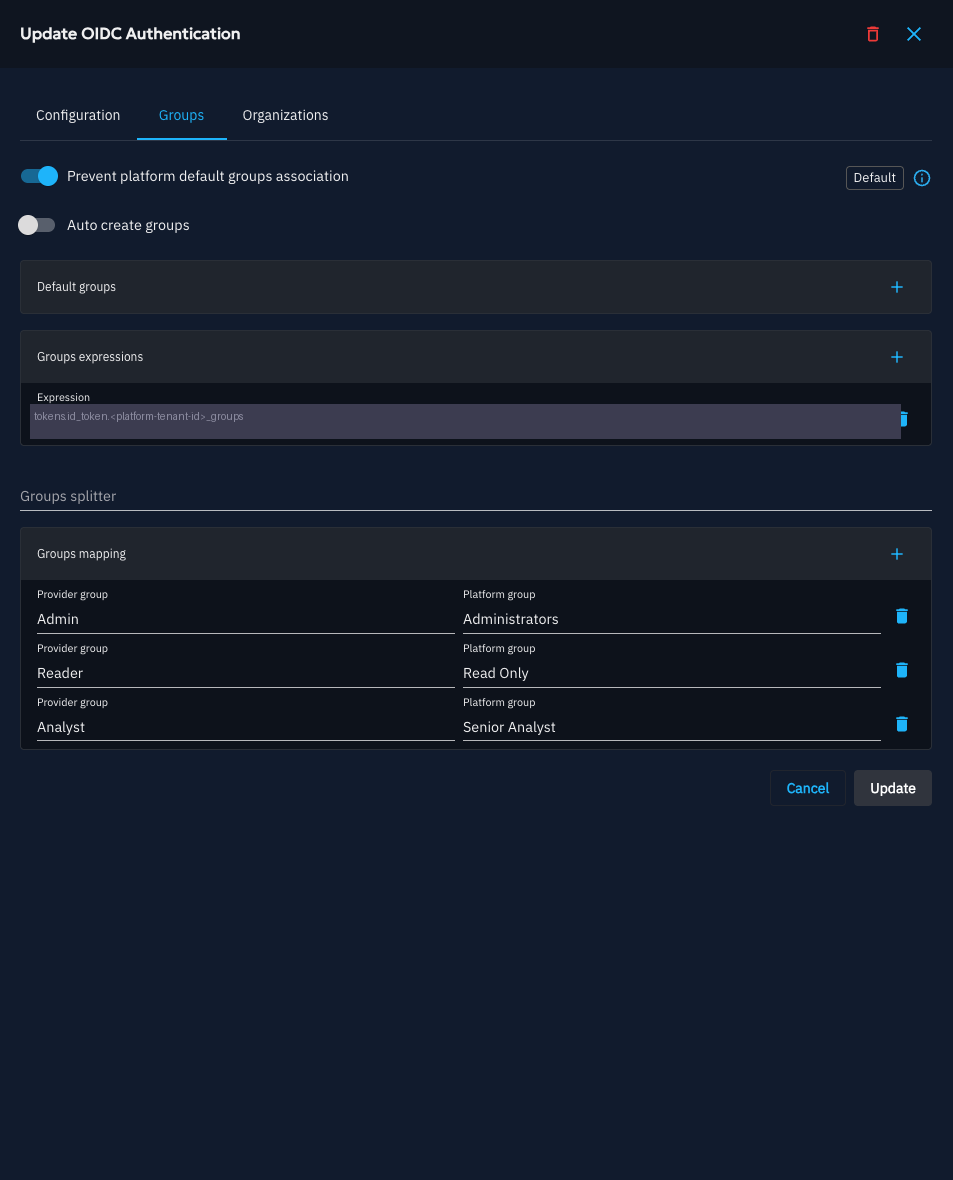
Switch to the Groups tab to define how IdP groups are mapped to OpenCTI groups.
Groups expression — point to the claim that contains the group list. When the claim is nested in the ID token (rather than the user_info endpoint), prefix it with tokens.id_token.:
Finding the right expression
Open the authentication logs and inspect the Details of a login attempt. The raw token payload shows all available keys. Use user_info.<claim> for claims from the userinfo endpoint, or tokens.id_token.<claim> for claims embedded in the ID token.
Groups mapping — map each IdP group name to the corresponding OpenCTI group:
| Provider group | Platform group |
|---|---|
Admin |
Administrators |
Reader |
Read Only |
Analyst |
Senior Analyst |
Exact group names
Group names are case-sensitive. The Provider group value must match exactly what the IdP returns in the claim. The Platform group value must match exactly the group name as it exists in OpenCTI.
Troubleshooting an authentication
Use logs provided through UI
When setting up an authentication, it might be difficult to have it right at first try.
For each authentication except Local, the last 50 logs are available to help you troubleshoot any configurations (next to the edit button). Each log will have the following information:
-
Timestamp: when did the log occur
-
Level: Info, Success, Warning or Error.
-
Message: the message indicating the error
-
Details: you can view the full log by clicking on the button on the right-hand side.
In case you are locked out
It is possible to lock yourself out of the platform. We have a few safeguards to avoid this situation, but it can still happen: for instance, local authentication cannot be disabled if you do not have any other authentication enabled.
Failed migration
In case your authentication used to work prior to the migration, there is a solution:
Steps to unblock yourself:
-
In your configuration file, add the variable app:authentication:force_env.
-
Set the value to true.
-
Restart your platform again.
This will allow you to use your configuration file to login instead of the configurations stored in database.
However, you won't be able to edit any authentication in UI, given you have stated that you wish to use your variables to login.
Enabling the app:authentication:force_env variable will remove any stored authentication in your database. When the platform is restarted without this configuration, all compatible authentications will be migrated once more.
Locked out of the platform, but a local account or administrator exists
In case you have locked yourself out of the application, by disabling local authentication without verifying that you have another working strategy, there is a solution.
This solution however relies on one of the following pre-requisites: - a local account with the capability to Manage Authentication exists, and you know its credentials. - you have access to the administrator credentials defined in your configuration file.
Steps to unblock yourself:
-
Go into your configuration file and add the variable app:authentication:force_local.
-
Set the value to true.
-
Restart your platform using this configuration.
You should be able to log in via username and password. Once logged in, enable local authentication again in the authentication menu, then remove this variable from your configuration file.
Locked out of the platform, no platform administrator or local account
This is the exact same situation as above, but you do not have any local account and you have disabled the administrator defined in the configuration file.
Steps to unblock yourself:
-
Go into your configuration file and add the variable app:admin:externally_managed.
-
Set the value to true.
-
Add the variable app:authentication:force_local.
-
Set the value to false.
-
Restart your platform using this configuration.
You should be able to log in via username and password. Once logged in, enable local authentication again in the authentication menu, then remove the added variables from your configuration file.